Deploying LetsEncrypt SSL/TLS certificates to DMZ servers
Note: This is an article published in Linkedin published on 2020.

In the last few days, I have seen a lot of articles and tutorials about how request, install and renew certificates from Let’s Encrypt in servers inside the company DMZ.
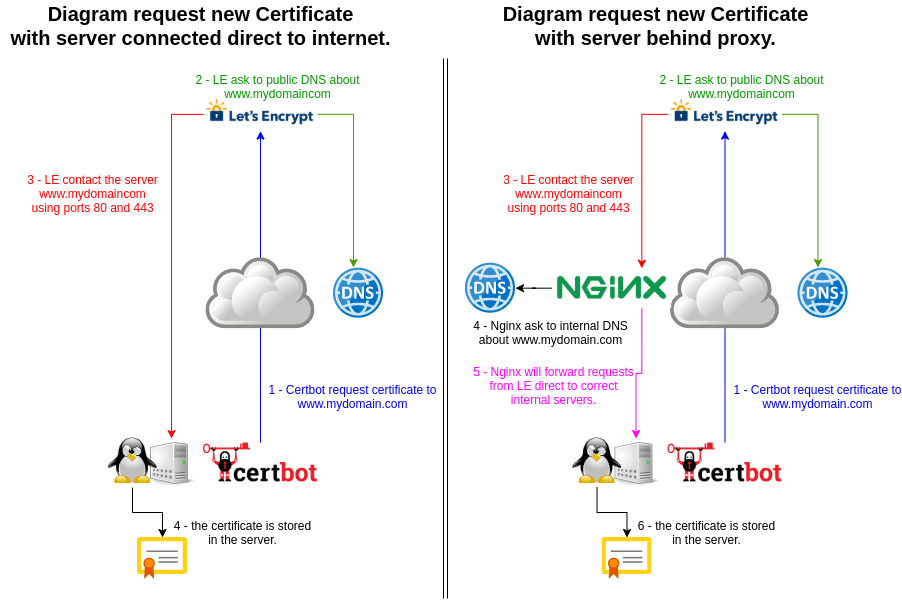
The origin of the “problem” is because to get a valid SSL/TLS certificate from Let’s Encrypt, the process of validation need to have access to your server by ports 80/tcp and 443/tcp temporarily. In other words, your “internal servers” should be accessible from the internet.
One old alternative was to have a server on the front line to manage the request of new or renew certificates and after this transfer the certificates files to the internal server using scripts with rsync/scp or manually.
This solution work when we haven’t so many servers or certificates to manage, but the process becomes complicated and susceptible to errors when you have more than 10 certificates/serves for example.
To work around this, these articles and tutorials are using containers to create a proxy machine that usually:
- They are sharing the file system where the certificates are with another containers.
- They create a specific configuration in the container that is associated with a specific internal server.
These solutions work too, but (IMHO) like the first “solution”, they are a bit prone to errors and complicate to management too. Why ?
- You need to create a new container/configuration every time that you create a new domain or server.
- If you change the IP from one internal server, you will need to update the association in the container too.
In resume, you still have a lot of jobs to maintain this configuration working.
To avoid this extra task, since a couple of years that we have been using a configuration that allows internal servers to manage their certificates autonomously, transparently and with “zero” external settings after the start-up. The requirements are:
- DNS with “Split View” or internal and external DNS.
- Nginx web server with access from the internet (80 and 443).
DNS with “Split View” or internal and external DNS. The idea of “Split View DNS” is to respond with different information based of client origin. For example, if we have this sub-domains in our DNS:
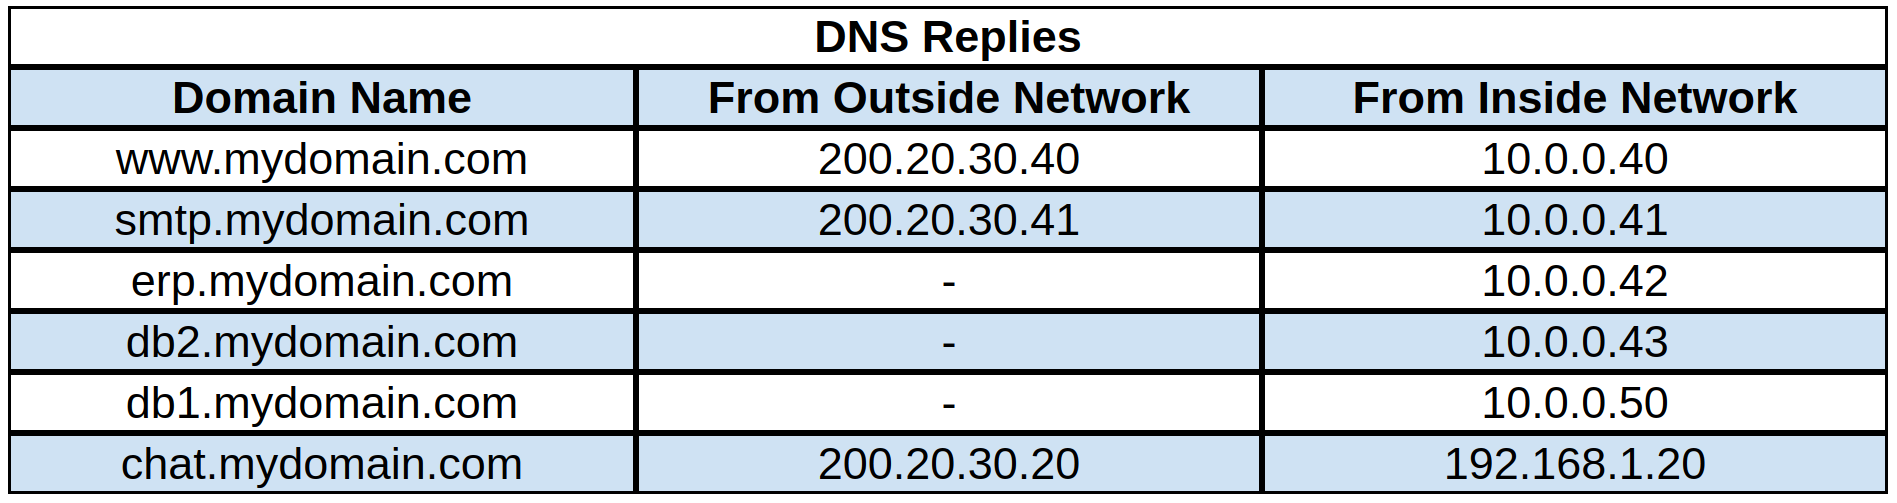 table with a DNS replies comparative.
If an internal client (PC or Server) asks about “www.mydomain.com”, the DNS will reply with the internal IP (10.0.0.40). If the same query are done from outside, the DNS will reply with the external IP (200.20.30.40).
We can see in the same image that the DNS will respond with an IP 10.0.0.42 if an internal client asks for “erp.mydomain.com”, but it will not respond with an IP if the query comes from outside.
Note: “Split Views” has many other advantages and you should definitely take a look. But, if you are not using “Split Views” another way is to have two different DNS servers. One public access DNS (digitalocean, namecheap, godaddy, etc) and one internal DNS (bind, active directory, etc).
Regardless of whether you are using split views or two DNS, the goal is simple: When Let’s Encrypt asks about “erp.midomain.com” they will get the IP of our external server (200.20.30.40). When you ask about “erp.mycompany.com” from inside your network, you will get the IP of the internal server (10.0.0.40).
Nginx web server with access from the internet (80 and 443).
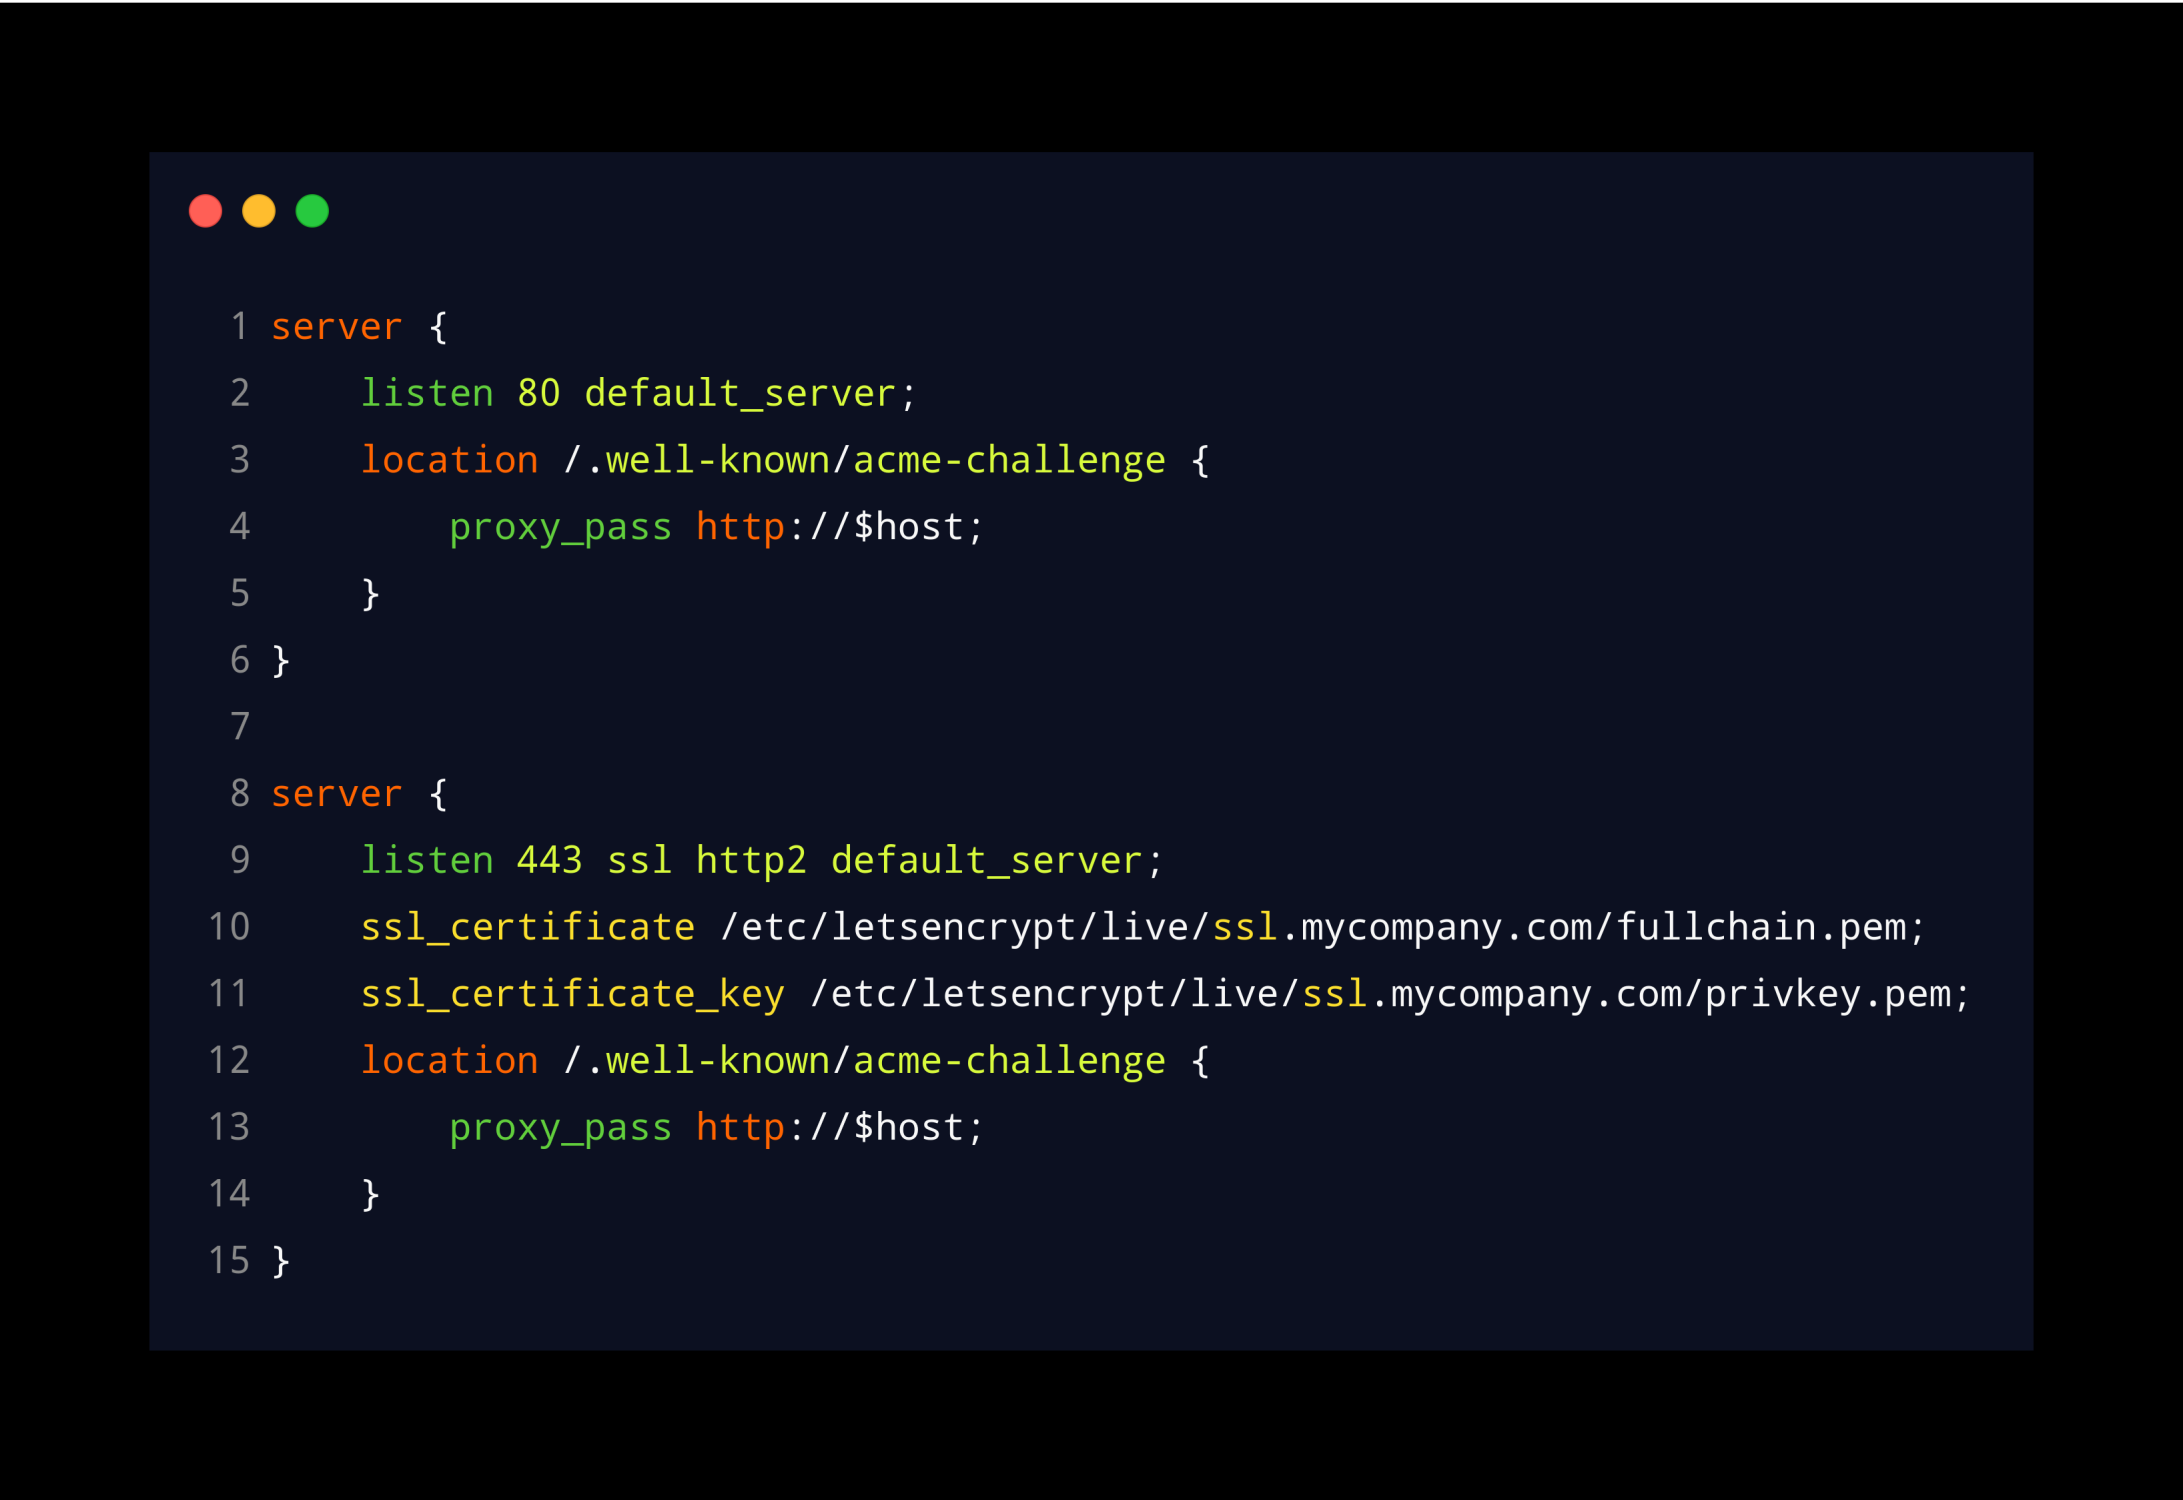
The second requirement is to have a Nginx server accessible from the Internet. You can either have a dedicated Virtual Machine or you can create a new configuration in your current Nginx.
You’ll need to make two basic changes. The first one:
- Create a site that accepts requests for any domain name (line 2).
- Create a “location block” that redirects ONLY the requests with “acme-challenge” in the URL to internal servers (line 3 and 12).
- Configure the “proxy_pass” option to send this request to a specific server (lines 4 and 13)
Note: In this case, the variable "$host" (lines 4 and 13) will be translated automatically to the domain name in the URL, for example: www.mydomain.com, erp.mydomain.com, chat.mydomain.com, etc.
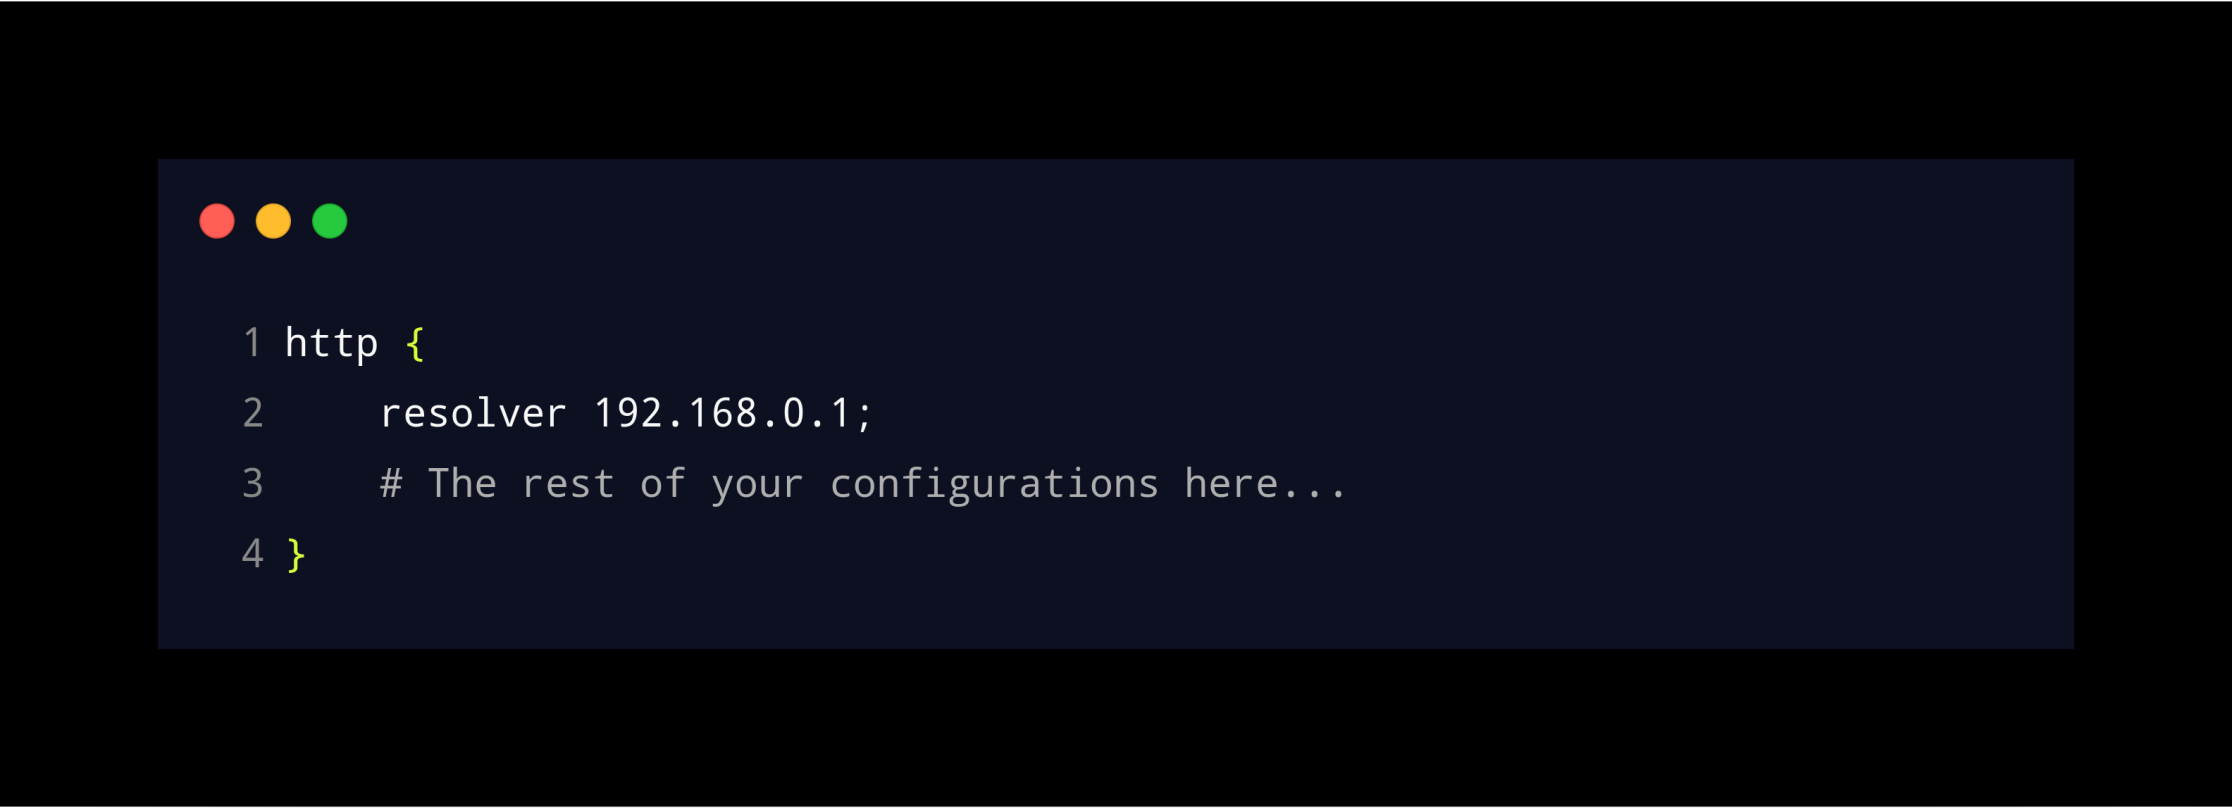
If you try to make a certificate request now, Nginx will generate an error, because Nginx uses its own DNS resolution to find out who "$host" is. So, Nginx will actually try to send the request to itself.
To avoid this, we’ll need to add a parameter in Nginx’s configuration (httpd block section) to use another resolver. In this case our internal DNS (line 2).
How does it work ???
When you are creating a new server or sub-domain, just make sure you create the respective external and internal DNS records (these tasks are usually part of the standard procedure when deploying a new server).
Comment: If you are using IPs to access your servers, sorry, but you have a problem! :-D
Having the DNS configuration ready, the whole process to request a new or renew a certificate is the standard with certbot and is done directly on the server itself as if it were connected directly to the Internet and without intermediaries.
And the most important, you won’t need to make any more changes to the Nginx proxy !!!
:-D